Storage System
This feature is available starting version 0.6
Introduction
SpoolEase provides a powerful system to organize, track, and manage 3D printing filament spools.
Using a combination of structured storage, optional free-text locations, and NFC-based location tags, you can efficiently monitor where each spool is stored, track its location, and quickly tell where it's located.
This guide explains how locations work in SpoolEase, how to configure your storage system, how to use it and how to use NFC location tags to simplify managing your spools even more.
What is Location in SpoolEase
SpoolEase supports two types of locations. They can be used together for maximum flexibility.
- Managed location - A structured storage system defined in advance. Using managed locations enables advanced SpoolEase features.
- Unmanaged location - Free text. Useful for temporary or informal locations, for example "Loaned to John Doe".
Managed Location
A managed location follows a predefined structure.
A storage system consists of one or more racks.
Each rack is divided into levels (Bay → Shelf → Position → Container), defining the hierarchy of the storage system.
Each level can be:
- Not included
- Included with a value of 1 (expressing it exists, but just one)
- Included with any other positive number
For each included level you also define its numbering order.
For containers, you additionally define their capacity (how many spools they can hold).
Hierarchy Rules
Each rack can have a different structure.
- Each level defines how many items exist within the level above it.
- If a level is not included, the next included level applies to the closest existing parent level.
- Example: If Bay, Shelf, and Position are not included, then the number of Containers defines how many containers exist directly in the rack.
This flexibility allows many possible structures, but you should define a structure that matches how you actually think about and use your storage.
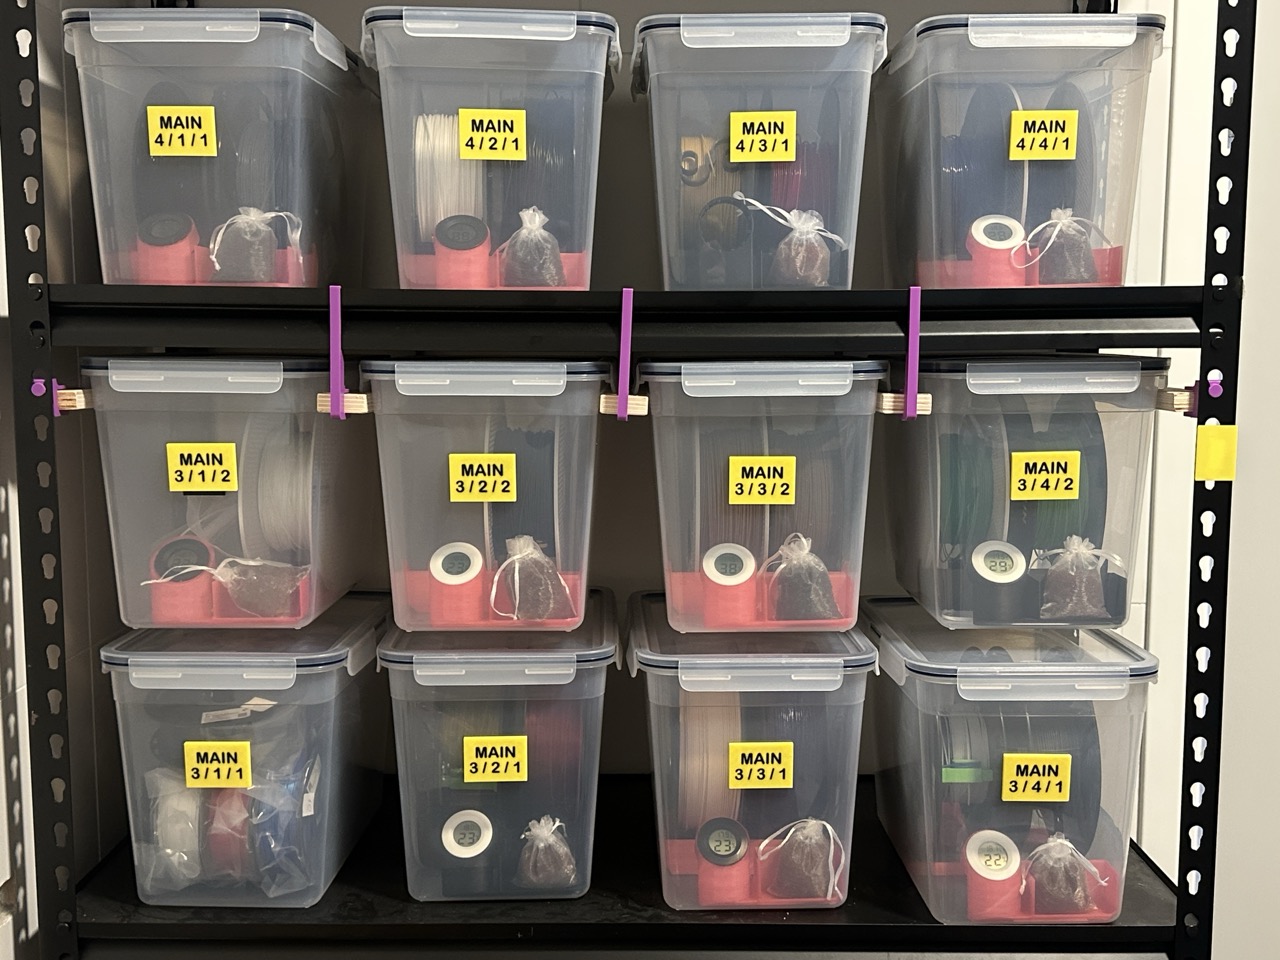
Example
Below is an example showing shelves 3 and 4 in a rack named “Main”.
This rack is configured with no bays, 5 shelves, 4 positions per shelf, and up to two containers per position.
Each container is labeled with its exact location. Inside each label is an NFC tag that represents that location. More details about how NFC is used are provided later in this document.
Note that this is only an example. Many other configurations and approaches for configuring racks and for using NFC tags and labels are possible.
Current Limitations
- A rack cannot have variable counts at different hierarchy branches.
- Example: You cannot define one bay with 5 shelves and another with 7 shelves.
- Therefore, use the maximum needed value.
- This may be supported in the future.
Partial Locations
When assigning a location, not all defined levels must be specified.
Example:
- Even if a rack supports Bay, Shelf, Position, and Container, a location can be defined as only "Bay 1, Shelf 2".
This is useful for some workflows but can lead to ambiguity if used carelessly.
Spool Locations
Each spool can has two locations fields:
- Assigned Location
- Actual Location
Both are optional.
- Assigned location represents where the spool is supposed to be stored.
- Actual location represents where the spool currently is.
Each location can independently be either managed or unmanaged.
Example:
- Assigned location: Rack "Under Printer, Shelf 2, Position 3"
- Actual location: "Loaned to John Doe" or "Office, Container 5"
Basic Operations
With the concepts above, you can already perform the following:
- Define storage configuration (racks and their structure) - in the Inventory application.
- Set or clear assigned and actual locations per spool using either managed locations or free text - in the inventory application.
- When a spool is loaded into AMS, its actual location is automatically cleared, and the inventory will display its location in the printer.
- Manually mark a spool as removed from storage by scanning it to staging and selecting Pick from Storage.
- When a spool is in staging and has an assigned location, select Place in Assigned Spot to copy the assigned location into the actual location.
This covers basic needs, but assigning arbitrary locations manually through the inventory application is not always convenient. This is where location tags come in.
- After selecting Pick from Storage or Place in Assigned Spot, the Console displays the spool’s Actual Location or Assigned Location, making it easy to know where to go to fetch or return the spool.
- SpoolEase Console includes a feature that simplifies picking spools from storage when staging is empty. Tapping the staging area allows you to enter a spool ID and load that spool into staging.
To pick a spool from storage:
- Find the required spool in the inventory and note its ID.
- Ensure staging is empty, then tap the staging area on the Console and enter the spool ID to load it.
- Tap staging, select More…, then choose Pick from Storage. The spool’s actual location is displayed so you can retrieve it. After picking the spool, press Spool Picked to clear its actual location in the inventory.
Location Tags
Location tags add an additional interaction layer on top of the location system.
Don’t mix up location tags and spool tags - they’re different and used differently.
- Location tags must be encoded before use (see below) and are attached to a location like a container, shelf, or rack.
- Spool tags are linked to a spool record and don’t require encoding before use.
A tag can be either a location tag or a spool tag, but not both at the same time.
After configuring your storage system, you can create NFC location tags and attach them to your storage.
A location tag can represent:
- A full location (Rack, Bay, Shelf, Position, Container)
- A partial location (for example only Rack and Shelf)
Once placed, you can scan these tags with your mobile phone to access that location and perform actions in SpoolEase.
Currently, location tags are mainly used to assign locations to the spool that is loaded in the staging area.
Typical Use Cases
Placing an Arbitrary Spool in Storage
- Scan a spool on SpoolEase to load it into staging.
- Take the spool to the desired storage location.
- Scan the location tag using your mobile phone.
- Assign the location to the spool.
- Before step 4 you can also optionally refine the location (for example add position or container if the tag represents only a shelf).
Returning a Spool from AMS
- Remove the spool from AMS (it is automatically loaded into staging).
- (Optionally weight it on the scale.)
- Continue from step 2 of the previous scenario to put it back in place.
More capabilities will be added in the future.
Location Tag Technical Details
To use an NFC tag as a location tag, it must be encoded. This needs to take place only once per tag and at this time can only be done properly from the Console and not from the Scale.
- The tag encoding is not tied to a specific location.
- After encoding, you can set and later change the location it represents without re-encoding.
Encoding a Location Tag
(Current flow will change in the future)
- Swipe right on the main screen to expose the screen on the left.
- Select Encode Location Tag.
- Place the NFC tag near the reader.
After a confirmation about successful encoding is displayed, the tag is now a location tag.
Mobile Configuration
No mobile application is required.
When scanning a location tag for the first time, you will be prompted to configure:
- SpoolEase console address
- Optional - the console security key
The same configuration screen is available at:
- The settings icon at the top right of the inventory
- Directly at https://tag.spoolease.io/config
The configuration is stored locally on the device and must be repeated for each mobile device and browser. If the site data is cleared these settings will be cleared as well.
Technical Notes
-
The console address can be an set as IP address (in this case it is required to be fixed IP in the router) or
{consolename}.localif mDNS is supported by your mobile/network. -
On iPhone:
- Using Safari with a hostname is slower.
- Chrome is fast with both hostname and IP.
- Using an IP address is always fast.
On Android:
- Still no information, using IP should work.
-
Configuration is browser-specific. If using two browsers, need to configure in each.
-
Data is stored locally on the mobile and accessible only to applications loaded from
tag.spoolease.io.- The application is fully client-side.
- No server is involved.
- Still, do not use a sensitive password you use elsewhere as your console security key.
-
If no security key is configured, you will be prompted for it on every scan.
-
The security key is never exposed over the network when using HTTP.
After configuration, selecting Continue will open the location tag application. This will take place automatically on future scans and configuration will only be required in case of issues.
Technical Side Note
Due to constraints of local HTTP-based devices, scanning a tag is implemented using a burst sequence of client-side redirects. This is normal and done for flexibility and reliability. This is too technical to explain here.
If the console is unavailable (for example powered off), scanning the tag will reach a page-not-found, and scanning again will bring you back to the configuration screen to verify settings (for the case where console IP has changed for example).
Using the Location Tag Web Application
When a location tag is scanned with a mobile phone, a web application comes up.
- If a scanned tag does not yet have a location, you will be prompted to assign one.
- On subsequent scans, the Location Tag application will open directly.
Location Page Overview
- The scanned tag is displayed.
- The associated location is shown as Selected Location. You can edit it using the pencil icon. This changes the location for current operations only and does not modify the tag itself.
Below the location, three tabs are available:
-
Location Spools tab – Displays spools linked to this location. The list is divided into:
- Spools currently at the location
- Spools assigned to the location but not physically there
- As operations are performed, a third list may appear of spools removed from both lists due to performing those operations.
Pressing a spool shows the operations available based on its actual location.
-
Staging Spool tab – Displays the spool currently in staging, including its location information (not to be confused with the Selected Location at the top of the page) and available operations.
-
Spool ID - Similar to Staging Spool but spool is selected by entering it's ID.
Available Operations
- Pick – Remove the spool from its current (actual) location. This clears the actual location in inventory.
- Place – Place the spool in the Selected Location. This updates the actual location in inventory.
- Assign – Set the assigned location of the spool to the Selected Location.
- Unassign – Clear the assigned location of the spool.
Example Workflows
To retrieve a spool:
- Locate the spool in inventory web application by filtering what you are looking for and check its actual location.
- Go (physically) to that location in your storage and scan the location tag you placed there.
- Edit the location if needed (e.g., specify the exact position if the tag is only for the shelf) to view the available spools.
- Select the spool and press Pick. The inventory will update to show the spool removed from the location. Assigned location, if any, remains unchanged.
To remove a spool from the AMS and place it in its assigned position:
- Remove the spool from the AMS. Its information will load into Staging. Press Staging to view its assigned location.
- Go to the physical location.
- Scan the location tag to pop the tag application. If needed, edit the scanned location as described earlier.
- Switch to the Staging tab and press Place to put the spool in the exact location. The actual location in inventory application will be updated.
The Tag Web Application is in early development. Many additional features are planned to simplify further use cases.
Closing
With SpoolEase location management and NFC tags, you can streamline your filament workflow, reduce errors, and always know where your spools are.
Whether you use simple managed locations, free-text unmanaged locations, or NFC tags for fast assignment, SpoolEase provides flexibility to match your workflow and storage setup.
As the system evolves, more features will be added to enhance tracking, reporting, and additional (really cool) integrations to make storage management even simpler.